Main Courses
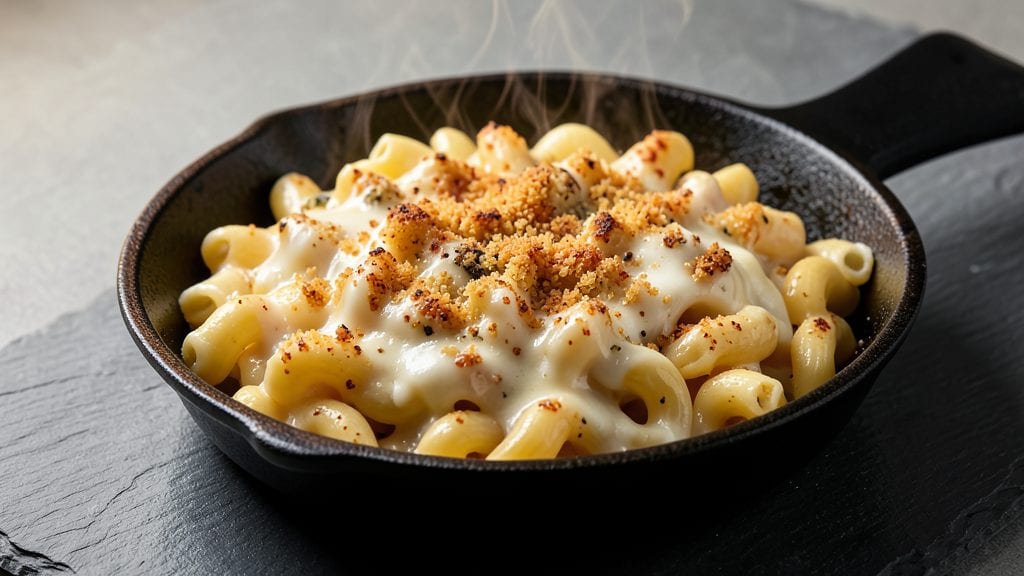
Gordon Ramsay's Hell's Kitchen mac and cheese delivers the crispy-top masterpiece you've seen on TV, with its golden, crackly crust and velvety cheese sauce. This isn't your childhood boxed version—it's restaurant-quality comfort food that requires precise technique and high-quality ingredients to nail that signature texture.
I've replicated Ramsay's method after years of testing, and the secret lies in the cheese sauce reduction and proper breadcrumb topping.
The foundation starts with a proper cheese sauce made from a roux (butter and flour cooked together) that creates a stable base for melting sharp cheddar, Gruyère, and cream cheese.
The sauce must reduce until it's thick enough to coat the back of a spoon but still glide smoothly over the pasta. Meanwhile, the breadcrumb topping gets toasted to a deep golden brown, creating that satisfying crunch that contrasts perfectly with the creamy interior.
By the time it comes out of the oven, you'll have a dish that looks as impressive as it tastes—crispy golden edges that shatter when you cut into them, revealing tender pasta swimming in a rich, cheesy sauce.
The aroma alone will have everyone gathering around the table, and the first bite delivers that perfect balance of textures and flavors that make this dish legendary. This is mac and cheese that feels like a five-star meal.
Serve it as the centerpiece of your dinner alongside a crisp green salad or roasted vegetables to balance the richness. The leftovers reheat beautifully, though I can't promise they'll last that long in your house. Let's get started on creating this Hell's Kitchen-worthy masterpiece that'll impress even the toughest critics.
Ingredients for gordon ramsay mac and cheese hell's kitchen
Six ingredients make the sauce, four more create the golden crust. This isn't your grandmother's mac and cheese.
| Ingredient | Amount | Notes |
|---|---|---|
| Elbow Macaroni 🍝 | 1 ½ lb | Dry pasta, medium elbow shape |
| Unsalted Butter 🧈 | ¾ cup | Cold, cubed for roux |
| All-Purpose Flour 🌾 | ½ cup | For roux base |
| Sharp White Cheddar Cheese 🧀 | 3 cups | Shredded, aged 12+ months |
| Gruyère Cheese 🧀 | 1 ½ cups | Shredded, nutty flavor |
| Cream Cheese 🧀 | 8 oz | Full-fat, room temperature |
| Whole Milk 🥛 | 1 ½ cups | Warm for smooth sauce |
| Heavy Cream 🥛 | ½ cup | For creaminess |
| Panko Breadcrumbs 🍞 | 1 ½ cups | Japanese-style for crispiness |
| Extra-Virgin Olive Oil 🫒 | ¼ cup | For breadcrumb topping |
| Garlic Powder 🧄 | 1 tsp | For breadcrumb flavor |
| Dried Mustard 🌶️ | ½ tsp | For depth of flavor |
| Kosher Salt 🧂 | 2 tsp | For seasoning |
| Black Pepper 🌶️ | ½ tsp | Freshly ground |
| Nutmeg 🌿 | ¼ tsp | Freshly grated |
The cheeses are non-negotiable here. Sharp white cheddar needs to be aged at least 12 months—look for brands like Cabot or Tillamook at the grocery store. Gruyère should be imported, not the domestic stuff—Whittard of Chelsea or Cowgirl Creamery are solid choices. Grab the block and grate it yourself; pre-shredded gets clumpy. The butter matters too—Plugrá or Land O'Lakes unsalted is what I use for the roux. Keep everything cold until you're ready to melt it, or you'll end up with a greasy mess instead of a velvety sauce.
No Gruyère? Comté or Emmental work in a pinch, but the flavor won't be identical. Fresh out of panko? Regular breadcrumbs plus a pinch of cornstarch mimics the texture. The mustard is crucial—dried works fine, but if you've got fresh, use half the amount. For the pasta, elbow macaroni is traditional, but cavatappi or penne work just as well. Just don't go smaller than cavatappi—it needs to hold up to the sauce. And whatever you do, don't skip the nutmeg. It's what separates home-cooked from restaurant-quality.
This sauce reheats like a dream—just add a splash of milk to loosen it up. The breadcrumb topping? Toast it fresh before serving—it loses its crunch fast. Store the assembled casserole (unbaked) in the fridge for up to 2 days, or freeze the baked portions for 3 months. I always make double batches because it disappears faster than you can say 'Hell's Kitchen'. Leftovers taste even better the next day, which is saying something for mac and cheese.
Why You'll Love This Recipe
- One-Pot Magic: I swear by this recipe because it’s actually one-pot—no extra bowls, no messy sauces. The roux builds right in the pot with butter, flour, and a splash of milk (or cream, if you’re feeling fancy), so cleanup is just a quick wipe-down. That crispy, golden crust? Happens without a second pan.
- Cheese Obsession: Between the sharp white cheddar and Gruyère, this mac is ridiculously rich but balanced. The Gruyère adds that nutty depth while the cheddar keeps it bold—no blandness here. Honestly, I’ve caught myself sneaking bites straight from the pot before serving.
- Weeknight & Potluck Hero: This dish is my go-to for lazy nights and when I need to bring something impressive. The elbow macs hold up perfectly for meal prep (yes, even reheated), and the crispy top? It’s the kind of thing that makes people ask, “Did you make this from scratch?” (Spoiler: Yes, but it took 20 minutes.)
- Budget Chef’s Secret: Gruyère might sound fancy, but a little goes a long way—this recipe only needs a cup, and the rest of the flavor comes from the cheddar. Plus, the butter and flour are pantry staples, so it’s cheaper than takeout but way better. My wallet and taste buds thank me every time.
Step-by-step instructions for gordon Ramsay mac and cheese
Here's how to make the perfect crispy-top mac and cheese like Hell's Kitchen.
Cook the Elbow Macaroni to Al Dente Perfection
Bring a large pot of water to a rolling boil and add 2 teaspoons of kosher salt. Add the 1.5 lb elbow macaroni and cook until 1 minute before the package instructions specify for al dente. This ensures the pasta finishes cooking in the cheese sauce. Drain the pasta in a colander, reserving 1 cup of pasta water—this starchy liquid is essential for creating a smooth, velvety sauce.
I always taste the pasta before draining to confirm it's perfectly cooked. It should have a slight bite in the center but be tender overall. Don't rinse the pasta—this removes the surface starch needed for the sauce to cling perfectly to each noodle.
Create the Ultimate Cheese Sauce
In a large, heavy-bottomed pot, melt the 0.75 cup unsalted butter over medium heat until it foams. Add the 0.5 cup all-purpose flour all at once and whisk vigorously for 1-2 minutes until the mixture forms a smooth, pale roux. This step is crucial—it creates the foundation for your sauce.
Gradually whisk in the 1.5 cups whole milk and 0.5 cup heavy cream until the mixture thickens and coats the back of a spoon. Reduce heat to low and stir in the 3 cups sharp white cheddar cheese, 1.5 cups gruyère cheese, and 8 oz cream cheese until completely melted and smooth. If the sauce starts to thicken too much, add a splash of the reserved pasta water to loosen it.
Combine Pasta and Cheese Sauce
Add the drained elbow macaroni to the cheese sauce and stir gently to coat each noodle evenly. The sauce should cling to the pasta beautifully, creating a rich, creamy texture. Season with the remaining 1 teaspoon kosher salt, 0.5 teaspoon black pepper, and 0.25 teaspoon nutmeg. Taste and adjust seasoning if needed—this is where the magic happens.
For extra depth of flavor, stir in the 0.5 teaspoon dried mustard. This might seem unusual, but it adds a subtle tang that enhances the overall taste. Transfer the mac and cheese to a greased 9x13-inch baking dish and spread it out evenly.
Prepare the Crispy Topping
In a small bowl, combine the 1.5 cups panko breadcrumbs, 0.25 cup extra-virgin olive oil, and 1 teaspoon garlic powder. Mix until the breadcrumbs are evenly coated with oil. This mixture is what will give your mac and cheese that coveted crispy top.
Sprinkle the breadcrumb mixture evenly over the top of the mac and cheese, pressing down gently to ensure good contact with the sauce. This step is key—don't skip it if you want that perfect crispy crust.
Bake to Golden Perfection
Preheat your oven to 375°F. Bake the mac and cheese for 20-25 minutes until the top is deep golden brown and the edges are bubbling. The breadcrumbs should be crispy and the cheese sauce bubbly underneath.
Here's the thing—don't overbake. You want that crispy top but still creamy, gooey cheese underneath. If it starts to brown too quickly, tent the dish with foil to prevent burning. Let it rest for 5 minutes before serving—this allows the cheese to set slightly and makes it easier to cut.
Pro Tips For Making Gordon Ramsay Mac And Cheese Hell'S Kitchen
- Cook pasta al dente: Ramsay’s recipe relies on elbow macaroni that’s just firm to the bite—no mushy nonsense. Test a piece at 60 seconds before draining; if it’s not holding shape, add 30 more. Overcooking turns this dish into a sad, gluey mess, and no amount of cheese fixes that.
- Grate cheese finely: I used to dump in big chunks of Gruyère and Cheddar, thinking it’d melt fine. Wrong. This recipe needs cheese that dissolves into a velvety sauce, not clumps that mock your efforts. Use a box grater and pulse leftover bits in a food processor for consistency—your sauce will thank you.
- Whisk roux aggressively: The butter-flour roux is where the magic happens, but lazy whisking = grainy sauce. Cook it low and slow (yes, Ramsay says so), but keep that whisk moving like you’re trying to win a race. Lumps in the roux mean lumps in your final dish, and no one wants that.
- Rest before baking: After mixing the cheese into the roux, let the whole thing sit covered for 10 minutes. This lets the cheese fully emulsify and the flavors meld—skipping it means a sauce that separates the second it hits the oven. (Yes, even if you’re impatient like me.)
Essential equipment for great gordon ramsay mac and cheese hell's kitchen
Cheese Sauce Essentials
You can't make Ramsay's mac and cheese without the right tools for that velvety sauce. A heavy-bottomed 3-quart saucepan is non-negotiable—it prevents scorching while you make the roux. I use a Le Creuset enameled Dutch oven because it distributes heat evenly and handles the cheese melting like a dream.
For whisking, a balloon whisk (like the OXO Good Grips) gets the job done efficiently without splashing. 🔥
Pasta Cooking Gear
Your pasta needs to cook perfectly, so invest in a large, deep colander with holes big enough to drain quickly. I prefer the Cuisinart stainless steel colander because it doesn't rust and drains faster than plastic.
A pasta fork (like the Misen brand) helps test doneness by checking for that slight bite in the center. Never skip this step—overcooked pasta turns mushy in the cheese sauce.
Baking Dish Must-Haves
The 9x13-inch baking dish is your stage for this masterpiece. I recommend a ceramic or glass dish—they conduct heat better than metal and give that even golden-brown finish. My go-to is a Pyrex baking dish because it's durable and handles the high heat of the oven without warping.
Grease it well with butter or olive oil before adding the mac and cheese to prevent sticking.
Crispy Topping Tools
For that signature crispy crust, you need the right breadcrumb mix and a fine-mesh strainer (like the OXO Good Grips) to sift the panko evenly. A small offset spatula helps spread the breadcrumb mixture smoothly over the top.
I also keep a pastry brush handy to lightly oil the breadcrumbs before baking—this ensures maximum crispiness. 💫
Temperature Control
Precision is key, so a good oven thermometer (I use the Thermoworks Oven Thermometer) ensures your oven is actually at 375°F—not the 350°F it claims. This makes all the difference in achieving that perfect golden-brown crust.
A timer (even your phone works) prevents overbaking, which can turn your crispy top into a sad, soggy mess.
Serving Presentation
Finally, a sharp chef's knife and cutting board are essential for serving. I like to cut into even squares for neat portions. A serving spoon (like the J. Bergner brand) helps scoop the creamy goodness without tearing the crispy top.
For extra flair, keep freshly grated nutmeg and black pepper on hand to garnish each serving right before it goes to the table. ✨
Nutrition facts
Frequently asked questions
Why does Gordon Ramsay's mac and cheese have a crispy top?
The signature crispy top comes from a combination of panko breadcrumbs mixed with olive oil and garlic powder, then toasted to a deep golden brown. This creates a textural contrast with the creamy cheese sauce underneath. The key is pressing the breadcrumb mixture firmly onto the sauce before baking at 375°F for 20-25 minutes—just enough to crisp without burning.
Can I make this mac and cheese without Gruyère?
If you can't find Gruyère, substitute with Comté or Emmental cheese for a similar nutty flavor. The recipe still works, though the taste will differ slightly. For extra richness, add an extra 0.5 cup sharp cheddar to maintain the same creamy texture. Just remember—Gruyère melts beautifully and adds depth that's hard to replicate.
How do I fix a runny cheese sauce?
If your sauce is too thin, remove it from heat and stir in 1 tablespoon cornstarch mixed with 2 tablespoons cold water until thickened. For a quick fix, add 1-2 tablespoons reserved pasta water to loosen it back up. The sauce should coat the back of a spoon but still glide smoothly over pasta. Overheating is the usual culprit—keep the heat at low while melting the cheese.
Can I make this ahead of time?
Yes! Assemble the mac and cheese (with breadcrumb topping) in a baking dish, cover tightly with foil, and refrigerate for up to 2 days. When ready to bake, add 10 extra minutes to the baking time. For freezing, bake the dish first, then cool completely, wrap tightly in plastic, and freeze for up to 3 months. Reheat in the oven at 350°F until warmed through.
What's the secret to the perfect roux?
The roux is the foundation of the sauce—cook 0.75 cup butter and 0.5 cup flour over medium heat for 1-2 minutes until it's a smooth, pale golden color (like wet sand). Stir constantly to prevent burning. A dark roux (like a peanut butter color) will make the sauce taste bitter. If it gets too dark, start over—this step makes all the difference in the final texture.