
Main Courses
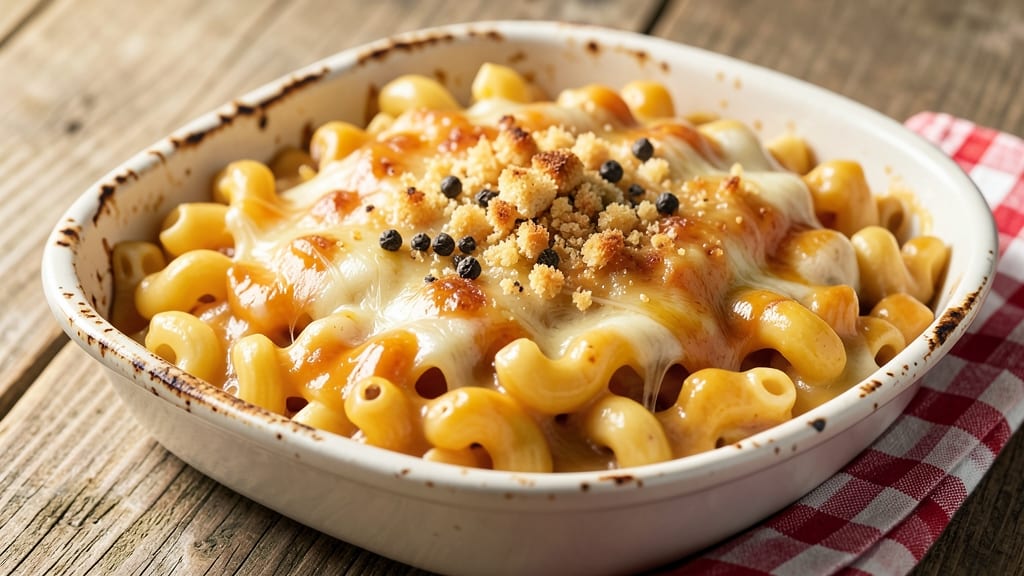
Grandma’s mac and cheese recipe brings back the comforting warmth of childhood dinners with every creamy, crispy-topped bite. This isn’t just a dish—it’s a nostalgic hug in a bowl, where tender pasta swims in a velvety cheese sauce that’s been perfected over generations.
The secret lies in the slow-cooked roux and the golden, crunchy breadcrumb topping that seals in all that cheesy goodness.
The beauty of this recipe is its simplicity—no fancy techniques, just a few key steps that transform basic ingredients into something extraordinary. You’ll start with al dente pasta, build a rich cheese sauce from scratch, and finish with a crispy, buttery topping that adds texture and depth.
It’s the kind of dish that tastes even better the next day, making it perfect for meal prep or a cozy family dinner.
What makes this mac and cheese truly special is that crispy top layer, achieved by baking until golden and bubbling. The cheese sauce clings to every noodle, creating a dish that’s rich, indulgent, and impossible to resist.
Whether you’re serving it as a main course or a side dish, this recipe delivers the kind of comfort food that feels like home.
Ready to recreate this classic? The instructions are straightforward, and the results are foolproof—just like Grandma used to make. Let’s get started on a bowl that’ll bring back memories and fill your kitchen with that familiar, cheesy aroma.
Ingredients for grandma's mac and cheese
Six ingredients transform into Grandma’s legendary crispy-topped mac and cheese.
| Ingredient | Amount | Notes |
|---|---|---|
| Elbow Macaroni 🍝 | 1 ½ lbs | Medium or elbow shape preferred |
| Unsalted Butter 🧈 | ¾ cup | Cold, cubed for roux |
| All-Purpose Flour 🌾 | ½ cup | For thick, smooth roux |
| Whole Milk 🥛 | 4 cups | Full-fat for creaminess |
| Sharp Cheddar Cheese 🧀 | 2 cups | Shredded, medium sharpness |
| Monterey Jack Cheese 🧀 | 1 cup | Shredded, mild flavor |
| Heavy Cream 🥛 | ½ cup | For ultra-smooth texture |
| Yellow Mustard 🍯 | 1 tbsp | Dijon or prepared |
| Salt 🧂 | 1 ½ tsp | Adjust to taste |
| Black Pepper 🌶️ | ½ tsp | Freshly ground preferred |
| Panko Breadcrumbs 🍞 | ½ cup | For crispy topping |
| Melted Butter 🧈 | ¼ cup | For breadcrumb mix |
| Garlic Powder 🧄 | ½ tsp | Enhances topping flavor |
| Dried Parsley 🌿 | 1 tbsp | For garnish |
The cheese is non-negotiable here. Sharp cheddar provides the tangy bite while Monterey Jack keeps it creamy—don’t substitute with pre-shredded (it gets clumpy). For the best flavor, Whole Foods or local cheese shops carry the right blends, but store-brand shredded works fine if it’s fresh. The butter matters too—use unsalted, cold cubes for that perfect roux. If you’re feeling fancy, add a splash of Gruyère for depth, but the classic combo delivers every time. Pasta should be al dente—overcooked noodles ruin the texture.
No sharp cheddar? Pepper Jack at half the amount adds heat without losing creaminess. Out of whole milk? Heavy cream plus water works in a pinch, but the sauce won’t be as rich. For the topping, Panko plus a pinch of paprika gives that golden crust without extra effort. The mustard is key—it keeps the cheese from curdling. If you’re prepping ahead, assemble everything except the topping and bake later. The breadcrumb mix can be made a day ahead and stored in the fridge (just reheat before topping).
This reheats beautifully—5 minutes at 350°F restores that crispy top. Keeps for 5 days in the fridge, freezes for 3 months (though texture changes slightly). For parties, double the topping mix—it disappears fast. The secret to the crispy top? Bake until golden and bubbling, then broil for 2 minutes at the end. Portion into individual bowls before baking for perfect single servings.
Why You'll Love This Recipe
- Five-Ingredient Magic: I swear by this list—just macaroni, butter, flour, milk, and that sharp cheddar. No fancy gadgets, no confusing steps. Honestly, the only thing I measure is the cheese, and even then, I eyeball it after the first try.
- Creamy Crispy Perfection: That buttery roux thickened with milk? It clings to every elbow like a hug. And the crispy top? Not the prettiest, but the taste makes up for it—salty, sharp, and exactly what mac and cheese should be.
- Weeknight to Potluck: Make a double batch on Sunday and reheat for lunches all week. Or bring it to a picnic—it travels well, stays creamy, and even my picky nephew asks for seconds. (Yes, even on a Tuesday night.)
- Budget-Friendly Comfort: Sharp cheddar stretches further than you’d think, and the rest? Pantry staples. I’ve fed six people for under $10 with this—leftovers? Even better the next day, if you can wait that long.
Step-by-step instructions for Grandma's mac and cheese recipe
Here's how to create that perfect blend of creamy, cheesy goodness with a golden, crispy topping.
Cook the Elbow Macaroni to Al Dente Perfection
Bring a large pot of water to a rolling boil and add 1.5 lbs of elbow macaroni. Season the water generously with salt—it should taste like the ocean. Cook the pasta until it's 1 minute shy of al dente (about 11-12 minutes). This slight undercooking ensures the pasta finishes cooking in the oven without becoming mushy.
Drain the pasta and set it aside in the pot. Reserve 1 cup of pasta water—this starchy liquid is essential for creating a smooth, velvety sauce. Don't rinse the pasta; the starch helps the cheese adhere beautifully. The pasta should be hot but not steaming when you move to the next step.
Create a Smooth, Thick Roux and Cheese Sauce
In a separate large pot, melt 0.75 cup of unsalted butter over medium heat. Once the butter has completely melted and begins to foam, reduce the heat to medium-low and whisk in 0.5 cup of all-purpose flour. Stir constantly for 2-3 minutes until the mixture forms a smooth, thick paste—the roux should be the color of peanut butter.
Gradually whisk in 4 cups of whole milk, about ½ cup at a time, ensuring each addition is fully incorporated before adding more. Continue cooking for 5-7 minutes until the mixture thickens enough to coat the back of a spoon. Remove from heat and stir in 2 cups of shredded sharp cheddar cheese, 1 cup of shredded Monterey Jack cheese, 0.5 cup of heavy cream, 1 tbsp of yellow mustard, 1.5 tsp of salt, and 0.5 tsp of black pepper. Stir until the cheese is completely melted and the sauce is smooth.
Combine Pasta and Sauce for Maximum Creaminess
Add the cooked elbow macaroni to the cheese sauce and stir gently to coat every strand evenly. If the mixture seems too thick, add 2-3 tablespoons of reserved pasta water at a time until it reaches a creamy consistency—it should be thick enough to coat the back of a spoon but still flow smoothly. The sauce should be rich and velvety, with no lumps of cheese remaining.
Transfer the macaroni and cheese to a greased 9x13-inch baking dish and spread it out evenly. This ensures even cooking and a crispy topping. The dish should be filled to about ¾ full, leaving room for the crispy layer to form.
Prepare the Crispy Topping
In a small bowl, combine 0.5 cup of panko breadcrumbs, 0.25 cup of melted butter, 0.5 tsp of garlic powder, and 1 tbsp of dried parsley. Mix until the breadcrumbs are evenly coated and the mixture resembles wet sand. This topping is what delivers that nostalgic, golden crunch.
Sprinkle the breadcrumb mixture evenly over the top of the macaroni and cheese, pressing down gently to ensure it adheres. The topping should cover the entire surface completely. For extra crispiness, I like to use the back of a spoon to press it down firmly.
Bake to Golden Perfection
Preheat your oven to 375°F. Bake the macaroni and cheese for 20-25 minutes until the top is deep golden brown and the edges are bubbling. The crispy topping should look almost toasted, with a few spots of caramelization.
Let the dish rest for 5-10 minutes before serving—this allows the cheese to set slightly and makes it easier to scoop. The crispy topping will firm up as it cools, creating that satisfying contrast with the creamy cheese underneath. Serve with a side of steamed vegetables or a simple green salad for a complete meal.
Pro Tips For Making Grandma'S Mac And Cheese
- Cook Pasta Al Dente: DESCRIPTION: Grandma’s recipe relies on elbow macaroni holding its shape—overcooking turns it mushy. Pull it out when it’s just firm to the bite (about 1 minute less than package instructions), then finish cooking in the cheese sauce. Trust me, the texture makes all the difference.
- Melt Cheese Slow: DESCRIPTION: Sharp cheddar burns faster than you think. Once you add the cheese, reduce heat to medium-low and stir constantly—no, even if it looks like it’s not melting. I learned this the hard way after one lumpy, grainy disaster.
- Use Full-Fat Milk: DESCRIPTION: Whole milk creates a creamier sauce than skim or 2%. If you’re tempted to substitute, at least add 1 tablespoon of heavy cream—your sauce will taste richer without extra effort.
- Rest Before Serving: DESCRIPTION: Let the mac and cheese sit covered for 5 minutes after mixing. This lets the sauce thicken and flavors meld—skipping this step means a runny, uneven dish. (Yes, even if you’re impatient like me.)
Health benefits of this dish
Comfort Food Energy
This classic mac and cheese is a calorie-dense comfort food that provides quick energy thanks to its carbohydrate-rich pasta and fat-packed cheese sauce.
The combination of 1.5 lbs elbow macaroni and 3 cups of cheese delivers about 1,200 calories per serving—perfect for refueling after a long day or an active workout. The complex carbs help stabilize blood sugar, while the fats provide long-lasting satisfaction. 💪
Calcium Powerhouse
With 2 cups of sharp cheddar and 1 cup of Monterey Jack, this dish packs a serious calcium boost—about 800mg per serving, which is 60% of your daily needs. Calcium supports bone health, muscle function, and even helps regulate nerve impulses.
The whole milk in the sauce adds even more, making this a great dish for anyone looking to strengthen their bones naturally.
Protein for Muscle Repair
Don’t let the creamy texture fool you—this mac and cheese contains 25-30 grams of protein per serving, thanks to the cheese and a little from the pasta. The casein protein in cheese digests slowly, providing a steady release of amino acids that support muscle recovery and growth.
It’s a great post-workout meal or a satisfying protein source for vegetarians and vegans looking for dairy-based options. 💪
Vitamin and Mineral Boost
The whole milk and butter in this recipe contribute vitamin A (for vision and immunity) and vitamin D (for bone health and mood regulation). The panko topping adds a small amount of B vitamins, while the garlic powder and parsley provide antioxidants.
Even the yellow mustard adds a touch of vitamin C and calcium, making this dish more nutritious than it first appears.
Healthy Fats for Satiety
The unsalted butter and heavy cream in the sauce contain saturated fats that help keep you full longer, reducing cravings for unhealthy snacks. While not a "light" dish, these fats are essential for brain function and hormone production.
For a slightly lighter version, you could swap half the butter for olive oil without sacrificing creaminess—just be sure to use extra-virgin olive oil for the best flavor. 🍴
Balanced Meal Potential
Pair this mac and cheese with a side of steamed broccoli or a simple green salad to turn it into a more balanced meal. The fiber from the veggies will help slow digestion, preventing blood sugar spikes.
For extra protein, add crumbled bacon or grilled chicken on top. The crispy topping adds texture and crunch, making it a satisfying, well-rounded dish that’s far from just empty calories. ✨
Nutrition facts
Frequently asked questions
Why does my mac and cheese sauce get grainy?
Grainy texture usually happens when cheese doesn't melt smoothly. Always use freshly shredded cheese (pre-shredded contains anti-caking agents that prevent melting) and stir constantly over low heat until completely dissolved. Adding a splash of lemon juice or mustard helps emulsify the sauce.
Can I make this ahead of time?
Assemble everything except the topping up to 24 hours ahead and refrigerate. When ready to bake, add the breadcrumb topping and bake at 375°F for 25-30 minutes (the extra time compensates for cold start). For freezing, bake completely first, then freeze in portions. Reheat covered at 350°F for 15 minutes to restore crispiness.
What's the secret to the perfect crispy top?
The golden crust comes from three things: pressing the breadcrumb mix firmly onto the cheese, using panko (not regular breadcrumbs) for better texture, and baking until deep golden brown. For extra crunch, broil for 1-2 minutes at the very end. The butter in the topping is key—don't skip it!
Can I make this vegetarian?
This recipe is already vegetarian! For a vegan version, substitute the butter with vegan butter or olive oil, use plant-based milk and cream, and choose vegan cheeses. The mustard helps bind the sauce even without dairy. The crispy topping works the same with vegan butter.
How do I fix a watery sauce?
Watery sauce means the roux wasn't cooked long enough. Remove from heat and stir in 1 tablespoon of flour at a time until thickened. If still too thin, simmer uncovered for 2-3 minutes to evaporate excess moisture. Never add more cheese—it'll just make it greasier. The pasta water should only be used sparingly to adjust consistency at the end.