
Appetizers
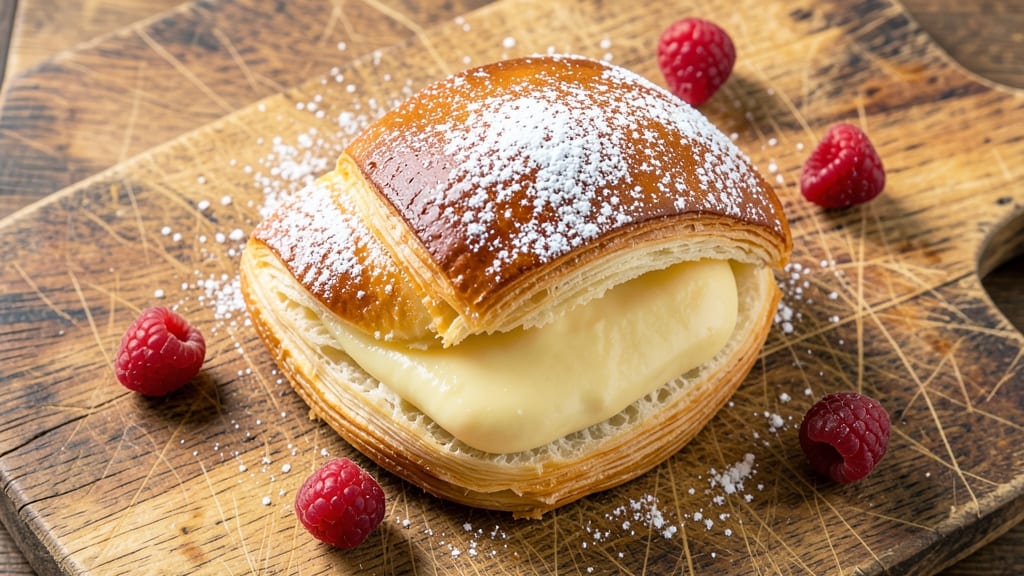
This copycat Starbucks cheese Danish delivers the same flaky, buttery layers and caramelized sugar crunch you know from the coffee shop—right in your home oven.
The secret lies in a precise laminated dough technique that creates those signature delicate folds, while a rich cream cheese filling and sweet icing replicate the café version perfectly.
I’ve tested countless variations to perfect the texture and flavor, ensuring every bite tastes like your morning Starbucks run without the wait.
The recipe begins with a cold dough technique that prevents gluten development, giving you those signature thin, crispy layers. A simple cream cheese filling (just cream cheese, powdered sugar, and vanilla) stays soft and tangy, while the icing—made with powdered sugar and milk—adds that signature glossy finish.
The key to success? Patience during chilling and careful folding to build those flaky layers without tearing.
By the time it emerges from the oven, your cheese Danish will have golden-brown, caramelized edges with a crackly sugar topping that shatters at every bite. The layers remain tender yet crisp, and the cream cheese filling stays creamy—not greasy.
This is the kind of pastry that disappears faster than your morning coffee, leaving only crumbs on the plate.
Perfect for breakfast, brunch, or a sweet treat any time of day, this recipe makes two Danish, so you can enjoy one fresh and save the other for later.
The dough can be prepped ahead, making it ideal for weekend baking. Let’s get started on creating your café-quality cheese Danish at home.
Ingredients for copycat starbucks cheese danish
Buttery layers, creamy filling, and caramelized sugar—just like Starbucks, but homemade.
| Ingredient | Amount | Notes |
|---|---|---|
| Unsalted Butter 🧈 | 1 cup | Cold, cubed for dough layers |
| All-Purpose Flour 🌾 | 3 ½ cups | Sifted, no substitutions |
| Granulated Sugar 🍚 | ¼ cup | For dough and icing |
| Instant Yeast 🍞 | ½ tsp | Fresh is best |
| Large Eggs 🥚 | 1 whole | Cold for dough |
| Salt 🧂 | ½ tsp | Fine sea salt |
| Milk 🥛 | ¼ cup | Cold, whole preferred |
| Cream Cheese 🧀 | 8 oz | Full-fat, room temperature |
| Powdered Sugar 🍚 | ½ cup | For filling and icing |
| Pure Vanilla Extract 🍯 | 1 tsp | High-quality preferred |
| Turbinado Sugar 🍚 | ½ cup | For caramelized topping |
| Heavy Cream 🥛 | ¼ cup | For brushing layers |
| Whole Milk 🥛 | ¼ cup | For icing |
The butter is non-negotiable here. European-style butter like Plugrá or Kerrygold has higher fat content, which gives you those signature flaky layers. If you can only find regular unsalted, that works too—just keep it cold. The flour? King Arthur or Gold Medal are my go-tos. They’re sifted and consistent, which matters for this delicate dough. For the yeast, Fresh is best—it activates faster and gives you better rise. If using active dry, it’ll take longer to dissolve in the milk. The milk needs to be cold (straight from the fridge) to keep the butter from melting too soon during the folding process.
No cream cheese? Philadelphia or full-fat cream cheese is ideal—it stays creamy when baked. The powdered sugar should be 10X or Domino for smooth icing. Short on vanilla? Imitation works in a pinch, but real vanilla extract makes a difference. The turbinado sugar is key for that caramelized crunch—don’t substitute white sugar. For the heavy cream, whipping cream works too, but it’ll have a slightly lighter texture. If you’re short on time, pre-made puff pastry can be a shortcut (though it won’t taste exactly like Starbucks).
The dough can be prepped 2 days ahead—just keep it wrapped in plastic in the fridge. The filling and icing can be made 1 day ahead and stored separately. Assemble the Danish 4 hours before baking to let the layers relax. Once baked, they’re best eaten fresh, but you can reheat slices in a 350°F oven for 5 minutes to restore the crunch. Store leftovers in an airtight container for 3 days—if they last that long.
Why You'll Love This Recipe
- No Yeast Nightmare: I swear, the instant yeast in this dough makes it foolproof—no waiting for it to bloom, no second-guessing. Just toss it in with the flour and butter, let it rise while you make coffee, and boom: golden, flaky layers without the fuss.
- Buttery Flake Magic: That cold butter cut into the flour? It’s the secret to the signature flaky, melt-in-your-mouth layers. The sugar in the dough caramelizes just enough to give it that subtle sweetness, but it’s the butter that makes it taste like you raided Starbucks’ bakery case.
- Breakfast or Snack: Honestly, I make these for lazy mornings, but they’re also my go-to for after-school pick-me-ups. Freeze half the batch, and you’ve got instant breakfast for days—no reheating required. (Yes, even on a Tuesday night.)
- Budget Bakery Hack: A single batch costs me pennies compared to buying one at the café. The dough’s so forgiving that I’ve even used store-bought puff pastry in a pinch, and it still turns out ridiculously good. Leftovers? They last a week in the fridge, wrapped tight.
Step-by-step instructions for copycat Starbucks cheese Danish
Here's how to recreate that signature Starbucks flavor at home with flaky layers and caramelized sugar crunch.
Prepare the Cream Cheese Filling
In a medium bowl, beat the 8 oz cream cheese with the 0.5 cup powdered sugar and 1 tsp pure vanilla extract until completely smooth and creamy. This should take about 2-3 minutes with a hand mixer or 1 minute in a stand mixer on medium speed. The mixture should be light and fluffy—no lumps allowed.
Spread this filling onto a sheet of parchment paper, then roll it up tightly like a jelly roll. Chill in the refrigerator for 30 minutes while you make the dough. This chilling step prevents the filling from melting when you incorporate it into the dough layers later. I like to wrap it in plastic wrap after rolling to keep it compact and easy to handle.
Make the Danish Dough
In a large mixing bowl, combine the 3.5 cups all-purpose flour, 0.5 tsp salt, and 0.5 tsp instant yeast. Whisk to remove any lumps, then make a well in the center. Add the 1 cup cold unsalted butter, cut into small cubes, and use your fingers or a pastry cutter to work it into the flour until you have pea-sized crumbs with some larger butter pieces remaining.
Pour in the 1 whole large cold egg and 0.25 cup cold milk, then mix gently with a wooden spoon until the dough comes together. The dough should be shaggy but hold its shape when pressed. If it's too dry, add 1 tablespoon milk at a time until it just holds together. Turn the dough out onto a lightly floured surface and knead gently for 2-3 minutes until smooth.
Layer and Chill the Dough
Divide the dough into 3 equal pieces and roll each into a 10x12-inch rectangle on a floured surface. I aim for about 1/8-inch thickness—thinner layers create more flaky results. Brush each rectangle generously with 0.25 cup heavy cream, leaving a 1-inch border around the edges. This creates steam during baking that separates the layers beautifully.
Place the chilled cream cheese roll on top of one rectangle, then cover with another rectangle. Press gently to seal the edges, then place the third rectangle on top. Seal the entire package tightly by pinching the edges. Wrap the dough package in plastic wrap and refrigerate for at least 2 hours or up to overnight. This long chilling time is crucial for developing maximum flakiness.
Shape and Bake the Danish
Preheat your oven to 375°F and line a baking sheet with parchment paper. Unwrap the chilled dough and roll it out into a 12x16-inch rectangle on a floured surface. Cut the dough into 2 equal rectangles (about 6x12 inches each). Roll each piece into a log, then twist the logs gently to create the classic Danish shape.
Place the shaped Danish on the prepared baking sheet. In a small bowl, mix the 0.5 cup turbinado sugar with 0.25 cup whole milk to create a wet sugar topping. Brush this mixture generously over the tops of both Danish. Bake for 20-25 minutes until the tops are deep golden brown and the sugar has caramelized into a crunchy topping. The internal temperature should reach 190°F when checked with an instant-read thermometer.
Cool and Serve
Transfer the baked Danish to a wire rack and let them cool for 10 minutes before slicing. The caramelized sugar topping will be hot and sticky at first, but it sets beautifully as it cools. For the best texture, serve the Danish warm or at room temperature. The layers should be light and flaky, with a perfect balance of sweetness from the caramelized sugar and creamy richness from the cream cheese filling.
Slice each Danish into 6 equal pieces for serving. The first bite should deliver that signature Starbucks experience—crispy caramelized sugar on top, layers of buttery flakiness, and a creamy center that melts in your mouth. These taste even better the next day when the flavors fully develop!
Pro Tips For Making Copycat Starbucks Cheese Danish
- CHILL THE DOUGH: I learned this the hard way—rolling out warm dough for the Danish layers is a recipe for tears. Pop the dough between sheets of parchment in the fridge for 30 minutes before shaping. Cold dough handles better, stretches cleaner, and gives you those crisp, even layers Starbucks nails.
- SALT THE BUTTER: Yes, even if it’s unsalted. Mix ½ teaspoon of fine salt into the 8 tablespoons of softened butter before cutting it into the flour. Skipping this step makes the dough taste flat, and you’ll end up craving more sugar to compensate—trust me, it’s not worth the extra spoonful.
- DON’T OVERWORK THE YEAST: The instant yeast in this recipe is a game-changer, but don’t let the dough turn into a chewy loaf. Once you’ve mixed it into the wet ingredients, stop folding and handle it as little as possible. Overworking activates the gluten, and you’ll end up with a tough, dense Danish instead of the tender, flaky layers you want.
- USE COLD EGGS: Pull the eggs straight from the fridge for this dough—no need to bring them to room temperature. Cold eggs add structure without over-softening the butter, and they help the dough hold its shape when you roll it out. I was skeptical until I tried it: the layers stayed crisp longer, and the final texture was noticeably lighter.
Troubleshooting this recipe
Dough Too Sticky
If your dough feels too sticky after mixing, resist the urge to add more flour—this disrupts the butter-to-flour ratio and ruins flakiness. Instead, chill the dough for 10-15 extra minutes before handling. I’ve found that using King Arthur flour (which has slightly lower protein) helps reduce stickiness while maintaining structure.
If absolutely necessary, add just 1 tablespoon flour at a time while kneading, but work quickly to avoid overhandling. 🧑🍳
Layers Not Flaky
Flaky layers require precise technique: cold butter and gentle handling. If your Danish turns out dense, your butter may have melted during folding. Keep everything chilled—even your rolling pin—and work in short bursts between chilling periods.
For extra flakiness, brush each layer with heavy cream (not milk) before folding, as the fat content creates more steam during baking. I also recommend using a pastry brush for even distribution. 🌟
Filling Melts Too Soon
The cream cheese filling must stay cool until baking. If it melts prematurely, your Danish will be soggy. Always chill the rolled filling for at least 30 minutes before incorporating it into the dough.
For extra insurance, wrap the chilled filling in plastic wrap and place it in the freezer for 15 minutes before rolling it into the dough layers. This prevents any warmth transfer during assembly. 🧊
Sugar Topping Not Caramelizing
For that signature crunch, the turbinado sugar needs proper heat and moisture. If your topping stays dry, ensure your oven is fully preheated to 375°F and that your Danish is placed on the middle rack (not too close to the heat source).
Brush the sugar mixture generously—don’t skimp! For extra caramelization, sprinkle an additional 1 tablespoon turbinado sugar on top right before baking. 🍯
Danish Collapses During Baking
Collapsing usually means the yeast overproofed or the dough wasn’t chilled long enough. If your Danish flattens, the dough likely needed longer chilling (try overnight instead of 2 hours). For future attempts, proof the dough in the fridge rather than at room temperature—this gives you more control over the rise.
Also, avoid overfilling the Danish; the cream cheese layer should be thin and even (about ¼-inch thick). 🏗️
Icing Too Runny
Powdered sugar icing can turn watery if the powdered sugar isn’t fine enough or if too much milk is added. Use Domino or 10X powdered sugar (both are ultra-fine) and mix the icing just until smooth—overmixing incorporates air, which thins it out.
For a thicker consistency, add powdered sugar 1 tablespoon at a time until it reaches a spreadable but not drippy texture. Let it sit for 5 minutes before using to thicken further. ✨
Nutrition facts
Frequently asked questions
Can I make this recipe with store-bought puff pastry?
The recipe uses a homemade laminated dough for that signature Starbucks flakiness, but you can absolutely use pre-made puff pastry for a shortcut. Just roll out the pastry, spread your chilled cream cheese filling, fold it into a log, brush with the sugar-milk mixture, and bake as directed. The texture won't be exactly the same, but it'll still taste delicious—especially if you use high-quality puff pastry like Pepperidge Farm or Storebought.
Why does the recipe call for chilling the dough overnight?
Chilling the dough for at least 2 hours (or overnight) is crucial for developing those delicate, flaky layers. The cold temperature slows gluten development, allowing the butter to stay solid and create crisp, separate layers when baked. If you're short on time, try chilling for 4 hours in the fridge—just don't skip this step, or your Danish will turn out dense instead of light and airy.
Can I make this recipe without turbinado sugar?
Yes, but you'll miss that signature caramelized crunch. For a substitute, use white granulated sugar mixed with 1 tablespoon corn syrup per ½ cup sugar to help with caramelization. Alternatively, sprinkle the baked Danish with coarse sugar after baking for a similar effect. The flavor won't be identical, but it'll still taste like a café-style pastry.
How do I store leftovers to keep them fresh?
Store your cheese Danish in an airtight container at room temperature for up to 3 days. For longer storage, wrap individual slices in plastic wrap and freeze for up to 1 month. To reheat, warm slices in a 350°F oven for 5-7 minutes until the caramelized topping becomes crispy again. The texture won't be exactly the same as fresh, but the flavors will still be delicious!
Can I make just one Danish instead of two?
The recipe makes two Danish, but you can easily halve the dough and filling to make just one. Simply divide the dough into 3 equal pieces (instead of 6), roll and fold as directed, then shape into a single log. The baking time remains the same—just adjust your expectations for serving size. This is perfect for a single serving or if you're testing the recipe for the first time!